Saturday 28 December 2013

Early Summer Garden Update

Stopping in for a quick garden update in between all the bustle of Christmas and New Year. Some of these photos were taken a month ago when it was still pouring rain nearly every day (yes, this is still Australia, I checked!), and some more recently when the rain finally subsided and Summer began in earnest.

I re-potted two of my cacti:


If you must know, their names are Big Red and Spiky Spud (I'll leave it to the reader to decide which is which). My views on 'Mutant Cacti' are ambiguous: I feel slightly disturbed whenever I see them, yet I feel sorry for them and want to take them home with me. I got Spiky Spud from the A Prickly Affair stall in the city. It came with a leaflet explaining how to keep your cactus nice and small (obviously designed for apartment dwellers). I had to laugh because it seems, even my cacti are bonsai!

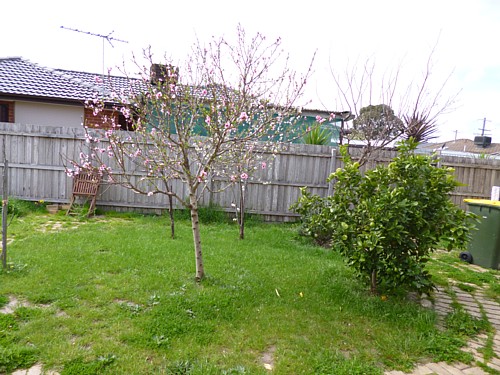
Oh, and check this out! My fruit trees are growing fruit! All I did was give 'em a bit of water and fertiliser, and they're growing fruit! Nature never ceases to amaze me.


They're at the stage now where I can confidently say that we have 2 apricot trees, a plum, an orange, a fig and possibly another variety of plum or a nectarine. Husband and I put bird netting on them last weekend: that's a whole story in itself!

Then there are some things that are doing well without any intervention whatsoever, like the fuchsia:


And even more impressively, the roses:


Every time I look at this rose, I can't help but smile. Lavender was one of my favourite colours before, and even more so now! Unfortunately it's finished flowering now, but there's a gorgeous dusky pink rose right next to it just starting up, so I'm very pleased. (P.S. Don't things look so much better when it's raining?)

And finally, my Shimpaku bonsai is recovering well from the shocking treatment it was given at the workshop. I'm very pleased and amazed at how well plants will bounce back from being hacked into pieces, having half their roots cut off and jammed into a tiny pot. Pretty cool. I'm looking forward to doing it to more plants soon. ;)


I'll wait until next winter and have a good look to see which branches I might want to style and which I want to cull. Having subscribed to a list of bonsai blogs as long as my arm lately, I realise now more than ever how a 90-minute workshop does not a bonsai make! I don't have any pretensions that my little Shimpaku will ever win any prizes, but at the moment I'm just fascinated with how everything just, well... grows!

Sunday 22 December 2013

I've Got Worms!

It's true. A few weeks ago, a large box arrived in the mail. Knowing how much Husband and I have suddenly become interested in gardening since we bought a house, our dear friend bought us a worm farm as a combined Christmas/wedding present.

I apologise in advance for the photospam, but I wanted to show the whole process of setting up the farm.
Here's the open box. It's the deluxe kit with the food collection bin and soil moisture/pH indicator, which will come in handy for a lot of things in the garden.


Underneath this were the worms themselves, in a cotton bag. Next to them was a soft drink bottle filled with water and wrapped in newspaper (presumably it was frozen when the journey began). This kept the environment nice and damp for the worms.


Putting together the base of the box. I screwed the legs to the base with wingnuts. I should say at this point that my workspace was the carport. We don't have a proper workspace set-up yet, so I was using the display cart that the old owners of the house left behind in the garden, in combination with the car bonnet to store extra parts. We got a real professional set-up here.


The base with the collection tray in place and the tap inserted.


Putting the lid on, just to see how it all fits together.


Now for preparation of the worm bedding. I had to wait 2 hours for the coconut fibre to soak into the water. It was a really long 2 hours! I think I spent the time perusing bonsai blogs. ;)


Testing the fibre. Unfortunately it was way too watery, so I spent some time carefully scooping out water and dumping it on the azaleas.

Time to lay the bedding. The instructions said to lay down 2-3 layers of newspaper in the tray. Who has newspapers anymore??! Thankfully we had a Bunnings catalogue lying around, which is made of the same type of paper.


Here I am scooping coconut fibre into the tray with a handy scoop that the old owners left behind in the shed. Spreading it nice and flat and even. It must be even, it must be flat. Flaaaaaat....


Then I re-read the instructions which said that the bedding must be loosely piled onto the base so the worms can get around easily. So Husband stuck his hands in and fluffed it up a bit.


Now finally for the worms!


Opening the bag was a lot of fun! There they were, wriggling around, wondering what's going on.... I'll spare you the close-up. The bag was full of a lot of shredded paper and worm food to keep them going during their journey to their new home.


As per the instructions, we dumped out the bag, and Husband bravely stuck his hands in again to distribute it evenly. The worms wriggled down into the bedding immediately, just as the instructions said they would.


We put the worm blanket on top of the bedding and sprinkled it with a bit of water to keep the worms all snug and happy.


The last step was to put the Vermi-Hut in its new home, in our carport. The system is very compact and fits in nicely out of the way.


I've been checking it regularly and, while I can't tell if the worms are actually happy, at least they're still alive. And no, I'm not going to name them all! :P

Thank you very much Ms E for our wonderful present!
xx

Sunday 1 December 2013

A New Bonsai Friend

It seems I've got Bonsai fever proper now, and I've been itching to get more in the last few months. Finally yesterday I gave in and bought this. It's a Callistemon Salignus, a Willow Bottlebrush:

It was in the Tube Stock section at Bunnings. I'm such a noob, I don't know if those couple of curled leaves are a problem or normal, but there's lots of vigorous growth at the top, so hopefully I made a good choice.
All the materials needed for re-potting and wiring:


My workbench is a display stand (?) that we found in the garden when we moved in.
I decided to attach the wire to the bottom of the pot for extra stability, and added some standard slow release fertiliser.

The poor little thing is a bit pot-bound, so I'm glad I decided to re-pot straight away. It took me a while to tease out the roots, but I finally got a nice spread. I'm using standard 'Premium' potting mix.


Now the wiring begins.
Self-Confessed Noob Mistake #1: (I'm sure there will be several more in future.) I used the wrong type of wire. I just grabbed the first wire I saw at Bunnings which happens to be fencing wire. Aside from being a garish silver colour, it's very stiff and difficult to bend. My hands were sore by the time I was only half-way up! I'll get some proper bonsai wire to use next time, I promise!


Now, how to style the little one? The trunk is still very flexible. I looked at some Bottlebrush bonsai online and they all seemed to be brush or multiple trunk. However, I noticed a slight undulation which you can see in the photo above. (Above photo is of the back.) I decided to take advantage of this and ... voila!:


So it seems the little one may be a windswept or perhaps semi-cascade style in years to come. I think after its first wiring is a good time to name bonsai, so I named this little girl Minami which means 'South' in Japanese, a nod to the fact that the Bottlebrush is a Native Australian plant, from the Southern Hemisphere.


I put her in the same sheltered spot where I'm keeping the creepers Husband and I bought at the Bonsai exhibition a couple of earlier this month. At centre is Husband's Virginia Creeper and at right is my Japanese Creeper (aka Boston Ivy). We've decided to leave them as-is until next year, but there's a taste of what they have to look forward to.
I think one of my next priorities might be a nice stand to keep the plants on!

Sunday 3 November 2013

I baked a Babka

The other day I felt like doing some baking, so I turned to the latest edition of Feast Magazine for inspiration. I decided to bake the Babka. (Sorry for the bad photo.)


I think the Babka and things like it are found in many cultures. It is filled with dried fruit and a rum syrup is poured over the top. I was excited to be able to use my new heart-shaped measuring cups for the first time. I'd bought them for myself as a treat a few months ago, but with moving house, etc, I haven't had time to do any cooking until now! So this is adding sugar to the egg mixture.


This is stirring the wet ingredients into the dry ingredients. I had to use powdered egg as I didn't realise I was out of eggs. Oops.


I left the dough to rise, but it didn't rise like it should. I even did the old trick of placing it in front of the open oven door for half an hour, but it still didn't behave. Did I have dud yeast, or was it the egg powder? Still, I continued on.


I rolled the dough out into a large rectangle as the recipe said. It was tough going due to the whole dough-not-rising-and-not-having-enough-volume-and-stretch thing, but I managed to roll it out to the size I needed to eventually.


I sprinkled the filling over the dough. Instead of dried cherries, I used dried apricots, which had been soaked in schnapps for several hours. Accompanying the chopped apricots are bits of everyday chocolate. Unfortunately in this picture, to me it looks like tomatoes and bits of meat, perhaps chopped roast beef! Am I making a pizza??!


Then I rolled the dough up into a log. I don't have a photo of that, but it doesn't take much imagination, I think. Then I cut the log into 7 slices, and arranged them in the tin.


After coming out of the oven, it looks nothing like the photo in the magazine! The 'bread' hasn't risen at all, and it has the grainy texture and crunch of shortbread. It seems I've made biscuit scrolls!


I didn't have any rum, so I used a mixture of schnapps and cherry brandy to make the syrup.


It was still delicious!

Tuesday 22 October 2013

Say hello to my little bonsai!

As I mentioned in my last post, now that Husband and I have our own house, we have our own garden, too. That means we can ... do gardening! We've both been interested in bonsai since we were kids, but never had the space or funds to keep them. Now all that has changed! On the weekend, we went and did a beginner's course at our 'local' bonsai nursery.

Though short, it was a great introduction, and we both came away with our very own bonsai. I decided to name mine Shinji; the H's is not yet named.

Shinji:


the Nameless one:


We're keeping them in a hutch we found out the back of the shed. We were going to break it up and put it in the hard rubbish, but thank goodness we didn't! It's the perfect shelter for our tender bonsai.
Both are Sargent Juniper, known as Shimpaku in Japan. Apparently they're one of the hardiest trees and are very suitable for a beginner. In the course, we prepared the pots, unpotted the tree, trimmed the roots and tied it into the new pot. Then we chopped the heck out of it! I really wish I'd had my camera with me so I could have taken a before photo. The tree was more than twice the size originally!


The instructor then further trimmed and wired each of our trees in turn. Most of the lower branches disappeared, the top came off and one of the small upper branches was trained upwards to become the new top.


Shinji is only a 5-year-old tree and was only trimmed for the first time. Perhaps it's more correct to say that it's a potensai (potential bonsai) rather than an actual bonsai at the moment. Bonsai take many years to mature and take shape. With more reading, I'm starting to understand that bonsai is a life-time prospect. A bonsai is a living tree, and it will grow and change. A bonsai is a work of art, but it is one that can never be 'finished'. The bonsai grower must always think of the future. How can the tree be improved in the coming years?

I've tried to think of some initial plans for Shinji, though as a beginner it's hard to visualise! Currently the two branches on the left side cross over each other. The lower one could be bent down a little more (green line) and the upper one bent up (orange line). Or alternatively I could cut it off altogether, or rip the end off to create a jin (deadwood branch). Some of the smaller branches at the top (purple lines) could be grown out to create medium-size branches to give it a more triangular shape overall.


So much to think about!
Whenever I get into something, I get into it hard, so I have an urge to go out and buy lots of potential bonsai stock, do more chopping and of course buy accessories and tools. There are also other types of potted plant arts that don't take as long to develop as bonsai, so perhaps I can look into those as well for some semi-instant gratification. I'll talk about those a bit next time.

Wednesday 2 October 2013

New Home!

As mentioned in my last post, sooo long ago, I moved house. Over 90 boxes later, we're in our new home! There are a few small things to be done with it, not the least painting, but unpacking will be the most work by far.


We also have a garden! Here are the fruit trees. I have no idea what fruits they are. I guess I'll find out in a few months' time!

Here's the fernery. (Part of it anyway.) Isn't it gorgeous!


Aaaand, the veggie patch!


There were already some veggies growing in there when Husband and I moved in, so it was instant harvest! Perfect if you like silverbeet and spring onions, anyway.....


....which I do, thankfully. All of my craft supplies are still packed, but I may have something to share soon.

Saturday 24 August 2013

I Finished Something!

And on time, too!
I made this monster toy for a birthday gift:


A 30th birthday is a big occasion, and I was feeling inspired, so I thought, why not? My inspiration wavered a lot over the month I had to finish the monsty. It took some hard slog in the end, finishing about 2 hours before I had to leave for the party, but I did it!


Parts of the monster are cobbled together from techniques from some of Stacy Trock's Fresh Stitches designs. (Yes, the designer I mentioned in my last post, too.) I've never been able to make arm/leg pieces that were consistently round and the same size until I started working with one of her patterns. They're awesomely written.
Other parts I made up myself, mainly the gusset design that I came up with a few years ago.


I really enjoyed making this monster, even the parts I normally hate, like sewing things on. The mouth and teeth are made of felt that I sewed on with embroidery thread. The colours aren't what I would have ideally chosen, but I didn't have time to go on a felt-hunting expedition by that stage. I still think he looks pretty cool!
I have to say that I'm now a safety eye convert! I ordered some from ebay when I first got the monster-making bug, not intending to use them on this specific project. I love them! I feel they really make the toy come alive. I bought a set of 20, so expect to see more monsters with matching eyes soon!


Speaking of Stacy Trock's designs, yesterday I caved and signed up for the Fresh Stitches Kit Club! Every second month, a kit is issued with a pattern and all the materials needed to make the toy, plus a special gift. The price seemed very reasonable and I feel safe that the pattern will be easy to understand, as all her other ones so far have been. Plus, all her toys are so cute! I can't wait til the first one arrives.

And ... saving the best til last ....

Guess what?

Husbandy One and I bought a house!


No, we didn't buy this house, it's for illustrative purposes only. ツ
We're moving in a couple of weeks, so my life at the moment has been filled with boxes. Many boxes. No time for crafting, sadly. But once that's all done, expect many posts on house decorating. I can't wait!