Showing posts with label preserving. Show all posts

Wednesday, 25 January 2017

Magical Herbal Balms Workshop

Last Sunday I went to a workshop on making magical herbal balms, hosted by Raheli of Belladonna and Bones. I had previously bought some of her subscription boxes, and found them wonderful, with very informative booklets accompanying them. As soon as I found out she was doing workshops, I signed up immediately.

I apologise for the quality of most of the photos in this post -- I took them using my ipod which is more convenient to carry around, but the camera isn't very good. (Yet another reason to upgrade my phone!)


The workshop was held at her house (in her garage, to be exact!) which was happily not that far from my house. Melbourne is such a large city that it can take 2 hours to drive from one end to the other, so it's always pleasing when there's something near me.

After some fresh mint tea and a discussion on herbal medicine, we got started making the balms. Each of the 6 participants was asked to think of a specific purpose we would like our balms to serve, whether it be physical, medicinal, emotional or magical. She then suggested herbs for each, explaining why they would be appropriate. Some were fresh from the garden, and others already dried in a forest of jars on a side table.

I asked for a balm to help with anxiety, and also separating my own feelings from others'. Something I've noticed a lot more in the last year or so is that I tend to pick up on the feelings of others and it's hard to tell what's mine and what's not. Raheli chose Lemon Balm (aka Melissa) for its calming effect and ability to enact change, and Valerian for its earthy, grounding properties.


While the herbs were steeping in the oil, Raheli took us on a tour of her garden. Raheli's garden was wonderful, a magical fairyland of herbs and cool, shadowy corners. Even though it was no larger than a standard block, there were hundreds of different herbs and other plants. I was so impressed by her knowledge of all the plants.


Once the balms were finished, we went back out into the garden and talked more about how they can be used for magical purposes, and about how to connect with plants and ask them to help us.


I learned so much from the workshop, and am grateful to Raheli for opening up her home and sharing her knowledge. I'm also going the second workshop in the series, on making tinctures and potions, and I can't wait! I purchased two plant friends: a skullcap (left) and yarrow (right). I don't know much about these herbs, but they wanted to come home with me, and I've been doing some research on how to look after them.


Here is the finished balm on my special shelf at home.


Belladonna and Bones website
Youtube Channel -- Raheli posts seasonal garden tour videos so you can see her garden for yourself!
her Instagram

Thursday, 5 January 2017

Apricot Harvest

The apricots from our tree seemed to come early this year -- they were ready for picking on New Year's Eve. This picture shows about 80% of the harvest. We kept a few back to use in cocktails and eating fresh.


I love how easy apricots are to process. The stones pop right out!


I decided to make stewed fruit instead of jam, as I wasn't quite ready for such a big undertaking, and also the harvest not quite big enough to justify so much effort. Stewed fruit is healthier than jam as well, as you only need to add a little sugar, or none at all if you like. I added about 3 tablespoons of sugar. The downside of stewed fruit compared to jam is that it must be stored in the freezer.


They only need to be cooked for about 15 minutes. The camera lens steamed up in this shot!


I put the apricots into small containers to make it easier to defrost and use them later.


Here are a few uses that I thought of for them:
⋆ pie filling
⋆ fruit crumble
⋆ serve with ice cream
⋆ topping for breakfast porridge
⋆ use in smoothies
⋆ apricot chicken dish

Saturday, 14 May 2016

Teeny-Tiny Olive Harvest ... Part 2

A little while back I posted about the olives that I picked from my little tree and packed in salt to cure. I left them for a few weeks longer than recommended, mostly because Husband and I were too busy and could never quite find a time to give them the proper opening ceremony they deserved. Eventually we just decided to wait until Mother's Day. Husband's parents came over for lunch. Seeing as they have a new olive tree and used a different method to cure their olives which didn't work very well, we thought they'd like to see the jar being opened.


The salt in the jar was quite damp -- a good sign as its purpose is to draw out the liquid in the olives.


I was excited to look inside and see what happened to the olives in the last 6 weeks.


We dumped out the contents onto a tray and I scooped the olives out.


They were very wrinkly! I think they must have been in the salt too long and dehydrated too much. I rinsed the salt off and we each tasted one.


They tasted pretty good! But Husband's parents said, wow, there's not much meat on them! We showed them the tree and they said, no, it's still too small! You're supposed to pinch the buds off the tree as soon as they appear, for the first 2 to 5 years. If you don't let the tree grow any olives, then it will put all of its energy into growing bigger, then when you finally do grow the olives, they'll be bigger and meatier.

To be honest, I probably would have just let them grow anyway, as I'm too much of a softie. And too impatient to taste them!


I found a teeny-tiny jam jar to put the rest of the olives in, covered them with olive oil and put in a few sprigs from our rosemary bush (that was Husband's idea). We are planning on making an antipasto platter for our Eurovision Song Contest party, so we'll probably eat them then.

I nearly forgot to mention -- we dried out the salt that the olives were cured in. It didn't take very long in a slow oven, and now we have olive salt as well! We've used it in soups and stews and it's not bad. With the amount we have, it will definitely last longer than the olives themselves. Irony?

Sunday, 20 March 2016

My Teeny-Tiny Olive Harvest

It was my first olive harvest, so I had to google it like a total noob.

Here are the olives in situ on our adorable little olive tree.


I think you're supposed to either pick them when green, or wait until they all turn purple, depending on what kind of olives you want. But birds had already tried to peck at some of them, so I decided to harvest them today, without any further delay.


Possibly the world's smallest olive harvest. Actually, last year it grew about 3, but they fell off before I could do anything about it. So I'm quite pleased.

Olives can't be eaten raw: they're too bitter. They need to be cured. I used this tutorial from Milkwood and the dry salt curing option. Luckily I have a 1-kilo tub of salt, which I bought for cheesemaking that I never got around to doing (yet!).


At least I knew how to sterilise the jar from my jam-making exploits earlier this year! I prefer the oven method, as the process of oven-baking dries the jar and you don't have to dry it manually.


Packing the olives in layers with the salt. Though I'm pretty sure there are supposed to be more than 5 olives in each layer!


The jar should seal itself as it cools down. The tutorial says to shake it every second day. After three weeks, taste an olive every few days to see if they're ready yet. If I did that, there'd be none left in no time! So I might give it 4 weeks and hopefully that will be OK.


I'll update when they're done! Perhaps I'll have a little olive party. A very little one...

Sunday, 17 January 2016

I made Jam

I made jam for the first time today. We had a good harvest from our plum tree this year, way too much to eat as we pick. Something had to be done! This is just under half of the total harvest. (I made stewed plums for the freezer with the rest.)


Cutting up the plums.


Look at this funny double plum! You'd never see that in the supermarket.


I was curious to see whether it was two plums that had somehow fused together, or one monster plum. There were two seeds inside, so that answers that question.


1.4 kilos of plums! I'm quite proud of my little tree.


I used this recipe from the CWA (Country Women's Assocation) Preserves cookbook. The Association is renowned in Australia for their traditional cooking knowledge. I got this cookbook just before Christmas, and I'm using it already. That's quite rare for me!
I decided not to add the port as I wanted to try a 'pure' jam for my first time.


The plums are boiling in a little water until soft.


Adding the sugar. I had to reduce the amounts to suit the amount of fruit I had, but it was a huge amount of sugar! 1.4 kilos! I had a 1-kilo bag, so I added all of it, but no more. It still felt quite wrong. But that's the traditional way....


While the jam was boiling, I prepared the jars. First I washed them in hot water and tried to get the labels off as best I could.


Sterilising them involves putting them in a slow oven for at least 15 minutes.


We tested the jam by pouring a small amount onto a plate that had been in the freezer for a while (to cool the jam down quickly). It wasn't setting as it should, so we added the juice of 1 lemon, as that causes the pectin to activate. After a second test, it was ready. I was too excited to remember to take photos of that part!

The process of filling the jars is pretty messy, but Husband, who has made jam before, assures me that this is perfectly normal.


And there we are -- 6 jars of plum jam!

Maintaining fruit trees and making produce from their harvest is certainly some work, I have to say. Pruning the trees, watering them, covering them with bird netting, monitoring the fruits so they're picked at just the right time. The process of making the jam was actually the least time-consuming; just over an hour. Sure, I could go to the supermarket and buy 6 jars of jam for $20 and save myself the time. I enjoy being amongst my trees, though. I love watching the ants run along the branches, and seeing the fruits slowly grow. I love the thought that I'll be doing the exact same thing this time next year.

Now that all the fruit is picked, I thank my tree and say to it, "you can rest now". Later this year, our work together will begin again.

Monday, 2 February 2015

My January

January this year has been an odd one. It's been a lot cooler and rainier than normal -- more like early Spring than high Summer. In my experience, that means that March and April are usually scorchers, but Melbourne weather is notoriously unpredictable. Much of my focus has been on work, so I haven't had the time or energy to do much else. I do have a few things to share, though:

What I've been making ...
I've been working a little on some clothes for my Lammily doll. I finally wove in the ends on her handbag and even sewed on a decorative button.


In anticipation of hot weather, I started making a tank top, and planning on some shorts or a skirt next. Ultimately, I'd like to write the patterns up and put them on Ravelry.


What I've been cooking ...
Last weekend, inspired by Pinterest, Husband made this amazing pizza pull-apart. It was really quite easy. ... Of course, he knows how to make pizza dough off by heart, so it was easy for him! It's definitely worth making again, so next time I'll document it and share it here. Needless to say, we nommed it.


What I've been drawing ...
I'd been meaning to start drawing again for a while, but recent world events spurred me on to sit down and actually do some. I'm all right when I'm copying from a scene or photo, but when I try to do anything without a visual reference, I'm on much shakier ground. Still, I'll show some dreadful sketches I did at lunchtime a few weeks ago. I found a shady spot down by the river, rolled dice to choose random subjects, and just mucked around with some assorted pens.


What I've been photographing ...
Lately I've been seeing more, in an odd kind of way, or perhaps noticing more, and wanting to capture it. So I've been taking more photos as well. I noticed the softly beautiful rose-pink light filtering in through the bathroom window one morning when I got up, and instead of grunting and having my shower (I'm not a morning person!), I grabbed my camera and took these few quick shots. The colour is not edited in any way.


What I've been picking ...
It's harvest time at Three Eyes House. The fruit trees are ripening and it's very exciting. The apricot was done a couple of weeks ago and we ended up with three bowls full of apricots like the one below. We stewed most of them and froze them for later, except for one portion that we spooned over our porridge last weekend.


Creamy porridge made with milk powder and a little salt, and home-grown fruit, dusted with nutmeg ... I always thought that when gardeners went on about how much better home-grown produce tasted it was a smug cliche. Well, I'm afraid I'm one of those people now, too! The plum tree has been very prolific as well, with two bowls full so far and at least one more still ripening up. Oranges are still ripening periodically and there are some lemons coming on. As for the nectarine, we have a total of three fruits this year. Husband and I shared one, and it was huge, juicy, and just about the most delicious nectarine I have ever tasted. (Sorry!)

Monday, 30 May 2011

In The Kitchen : Tofu Jerky

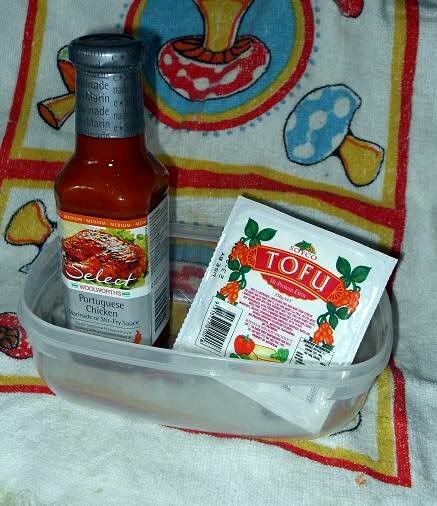
On the weekend, I had a sudden impulse to make tofu jerky! I've made meat jerky before; tofu is quite a bit cheaper! I chose Portuguese Chicken flavour for the marinade:


I cut the tofu up into slices. I know from my experience with drying meat and vegetables that they shrink by up to half, so I kept the slices quite large:


I poured a bit of the marinade into a plastic container, but it was so thick it wouldn't come out! So I added some vinegar to thin it out a bit:


I alternated layers of tofu and marinade, making sure the tofu was thoroughly covered:


It's best to be generous with the marinade, as it will settle and you don't want any of your tofu to be exposed. I went ahead and put the whole bottle in, to make sure there weren't any gaps around the edges:


I put the container in the fridge overnight. The next day, I fished the tofu pieces out, wiped them off and laid them on the dehydrator. Even though it's a bit messy, I think it's best to use your fingers, as you don't want the tofu to break up:


I lined the base of the dehydrator with foil to catch any drips (I learned this the hard way after making beef jerky!) I laid out the tofu slices with space in between so they air nicely:


I left them in the dehydrator for about 6 hours, turning them half-way through (that's why they have marks on them). It's important to dry them enough so that they're chewy, but not so long that they go completely dry and hard. This is how they looked at the end:


If it was meat, I would have thrown the marinade away. But as tofu is non-meat, it's safe to save and use for something else (we used it as a sauce for sausages and mash).
The tofu jerky came out quite well. Yum! I found it an interesting snack for when I need some protein - different to the nuts I normally eat, and definitely more convenient compared to tofu as it comes normally.