Monday 31 December 2012

2012 In Review

How funny it is that everything seems to change, yet everything seems to stay the same. Looking back on my 2011 In Review post, it seems that I could write everything in it over again for 2012. This year the changes were fewer, but had more drastic results. And in the end they turned out to be positive ones.

The year started off with a bang. I got married! I got a new job! It was a ninja marriage and a surprise job! A lot to take in and a big change for me.

My self-made ring cushion.

I finished a big project: a Harry Potter scarf for a dear friend to give to her dear brother. I double-knitted the scarf, meaning it took twice as much work, but it was really important to me to create a quality product. I literally spent hundreds of hours on it. I took it on holiday with me to New Zealand. I'm so happy to see how the scarf has been loved and even used in costumes. It's the best a crafter can hope for!

The Harry Potter Scarf.

I learned when to quit, even if it's painful. I started working on this baby scarf using the same technique as the Harry Potter scarf. But it was the wrong technique. The scarf just didn't feel right. Yet still I continued on it, blindly hoping that it would somehow come good. It just got worse. Finally, when it was even longer than in the picture, I bit the bullet and ripped it. Another lesson in knowing when to admit defeat.

Rip-worthy scarf in progress.

I started a third blog. Because a girl can't have too many blogs, right? I had a sudden and uncontrollable urge to write reviews about beauty products and do all the other things that beauty bloggers do. I don't see myself as a "Beauty Blogger" (my photos are too bad for a start!) but it's a fun side-project. And it gives me an excuse to buy lots of beauty products. Ahem.

Click the picture to go there.

I discovered Hama Beads! (AKA Perler Beads or Fuse Beads) They're ones of those crafts I've vaguely known about for years, but suddenly one day became completely obsessed with them. I made a rainbow, an 80s style cassette tape and a mini perfume holder for my dressing table. I suppose my obsession intertwined with my interest in Japanese Fairy Kei fashion which I had for most of the year. Which was obviously a reaction to the formal corporate dress code at my work and my feelings of restriction and not being able to express myself. Normally I save that kind of morbid over-analysing for my Path blog, so let's move on.

Perfect for the job!

Then two of my friends had babies, so I was focussed on making baby things for a while. When I say 'focussed on', I really mean 'made one pair of booties and spent a lot of time trawling through Ravelry and saving patterns'. But still, the intention was there.

Booties in a stereotypical colour.

Then, half-way through an accidental hiatus, I had a sudden and brief urge to write haiku. Very sudden and very brief. However, it's interesting to note that, on my list 40 Things To Do Before Age 40 which I drew up in late 2011, one of the items is to write a haiku a day for a month.

Meditate.....now!

More recently, I felt a sudden hopefully more permanent need to reach out to people via penpalling. I discussed the pros and cons in my blog before finally compromising and joining PostCrossing. Baby steps!

Some postcards I sent out.


2012 Statistics [2011 statistic in brackets]
Books finished: 43 + 17 short stories (70)
Books currently reading as of today: 11

Blog posts...
I'm A Table: 27 (51)
ShyCat Beauty 79 (n/a)
My Path: 94 (n/a)

PostCrossing...
Cards sent*: 8
Cards received: 5
* This only includes cards which have been received at the other end and registered.

Craft items started: ? (~11)
Craft items finished: 5 (~8)


Some of those statistics are very sadly low. But they do reflect my 2012 accurately. When I got my new job, I threw myself into it and had no energy to do anything else. Then I found myself in a position where my fitness/energy level had dropped dramatically, and I wasn't being creative at all. I had no inspiration. I was depressed for a long time. All I felt like doing was coming home at night, flopping on the couch and staring at the TV. It's only in the last couple of months that I've managed to haul myself out of that couch-hole and take back some of my old self.

I'm not going to make any resolutions for 2013. No elaborate plans or lists of things to do or monthly check-ins. I'm just going to see how things go. I'm going to be kinder to myself. Let myself be. A few days ago when I was sitting on the tram in a moment of quiet, a phrase popped into my head. It's one that really resonated with me, so I'm going to share it:

You can be free, if you want it.

Saturday 15 December 2012

More Sent Mail!

Well, I couldn't resist sending out another batch of postcards! I figured I may as well use up some of the Christmas stamps instead of buying extra postage in the New Year. I hope they arrive to the receivers by Christmas!


I really love reading the recipient's profiles, choosing a card that I hope will suit them, and writing a note on the back. It all adds to the fun, I think. I haven't received any more postcards since the two from my last update, but I know that things are slower this time of year - I'm trying to be patient!

I've done some other crafty stuff too, but haven't had a chance to take any photos yet. Maybe tomorrow!

Saturday 8 December 2012

PostCrossing: mid-month update!

I was only going to have a once-monthly postcard post, but I was so excited, I just couldn't help myself! Two more of the postcards I sent have been received, which makes a total of 3. The one to J. in the Netherlands took 26 days to arrive, and the one to A. in Germany took only 5 days to arrive! I still have 3 postcards in transit at the moment.

Excitingly, I also received two postcards this week!:


The first card, from S. in the U.K., took 12 days to arrive, and the one from E. in Germany took 13 days. I was so thrilled when I found them amongst the bills and junk mail that Husband brought in from the mail box. I'm thinking of sending a second batch of postcards this month, reason being: the stamps I bought are special discounted Christmas stamps, and once Christmas is over, I'd have to buy additional postage to be able to use them. What can a girl do??

Wednesday 5 December 2012

Postcards of the Month

A few weeks ago, I was talking about how I've joined PostCrossing and started sending postcards all over the world. And of course, receiving postcards in return (though not yet, as you'll see below!). I signed on with vigour, and dreams of many brightly-coloured postcards flying back and forth across the seas. It put me in mind of the excitement I used to feel as a kid whenever I received some fun mail. The only catch is that sending an international postcard is a little more expensive than it used to be! The postage stamp cost is AU$1.65, which is more than a chocolate bar; 2 would be about the same as a coffee-shop coffee. The postcards themselves range between 40c to $2.00 or more, depending on the quality, but I'm not so fussed about that cost as they're so fun to buy and collect. With the capability of sending 5 postcards at a time (to begin with), up to 100 at a time (for seasoned PostCrossers), this could turn into a very expensive hobby! I knew I had to find some way to restrain my stamp-spending while still having fun.

In my searching I happened to come across a Japanese phenomenon called Fumi no hi. It means "Letter Day" and it was started by the Japanese government in 1979 to promote regular letter-writing and usage of the postal system. 'fumi' means the number 23 and also 'letter', so the 23rd of each month was chosen as the monthly letter day. I really like the idea of sending out a batch of mail once a month, but I decided to choose the first of each month because it's a rounded number and it's easier for me to remember.

So welcome to the first monthly Postcard Day!

This month I sent out postcards to D. in Finland (top right), A. in Germany (lower right), and the Grade Four class of an elementary school in the U.S. (left). Sorry about the slightly bodgy picture, but it was past my bedtime last night when I took this!

Of the 3 postcards I sent last month, the one to A. in Germany has been received/registered. The ones to L. in Russia and J. in the Netherlands have not been received yet. Technically I only sent them 3 weeks ago, so I suppose it's reasonable that they haven't arrived in Europe yet. With one postcard being received, this means I'm eligible to receive one postcard! .... Which I haven't received yet, but I'm trying to be patient.


This whole patience thing is one that's interesting for me. I've become such a child of the internet and the 21st century. It's all about instant gratification and constant stimulation. Often it's over-stimulation, with hundreds of blogs on my reader, thousands of pictures on Pinterest, the TV on and often noise from Husband's computer-gaming as well! I'm being bombarded from all sides, and everything seems to be speeding up until it seems like it'll go off the rails. The thought that I might have to wait 3 weeks or more for something is almost unbearable!

I think this will be good for me - an enforced patience, a slowing-down. Taking the time to choose a postcard that matches the recipient's profile, taking a deep breath and writing something meaningful on the card. Seeing my own handwriting on more than just a shopping list or a work report. Waiting for the pieces of coloured cardboard to find their way to the other side of the world. Waiting hopefully for some to find their way to me.

Stay tuned for next month's Postcards of the Month!

Saturday 1 December 2012

Christmas Baking, Part 1 : Pepernoten

It's December today, officially the start of the holiday season. I don't normally start doing Christmassy things this early, but in the last few years I've been getting back to my Dutch roots and doing a few things for Sinterklaas Eve, which is on 5th December. I won't leave out a shoe full of carrots and a glass of brandy for St. Nicholas and his horse as is the tradition in the Netherlands - I might end up receiving a shoe full of coal from Zwarte Piet instead of a present in the morning! But food is a deep part of culture and tradition, so I did some baking!

Today I made traditional Dutch biscuits Pepernoten. I've made Pepernoten before and posted the recipe here. Today I'm doing more of a photo-essay.

First I mixed together the flour, brown sugar
and spices. The spices all smelled so wonderful. Scent is so powerful and it
brought to life many memories of Christmases past.


Next I cracked 2 eggs, added some orange essence, and poured the beaten mix
into the flour. I always float the eggs in water to see if they're fresh
before I start working with them.


The dough is dry and crumbly at first, and I always get worried that it won't come together. Just at the last moment though, it amalgamates and actually becomes sticky. Naughty dough for worrying me like that!
The scent of the spices mixed with the orange fills the whole kitchen and makes me think of the clove-studded pomanders I made as a kid.


I started rolling the dough into small balls using damps hands so it didn't stick.
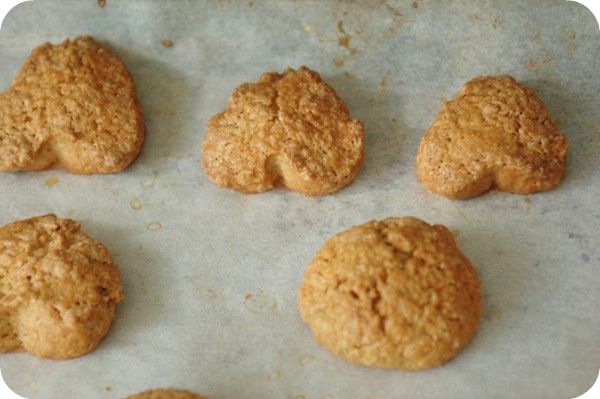
Husband suggested I try using one of our cutters to make heart-shaped pepernoten.
It was a stirling suggestion - they came out beautifully!


Rolling the dough balls with wet hands leaves them with a thin sheen of water
and a shiny appearance. Being slightly wet helps to make the pepernoten nice
and crunchy when they're cooked. I believe that artisan bakers spray their
bread with water before cooking to make a hard, chewy crust. Gastronomical convergences.


The pepernoten have turned out perfectly! The house smells spicy and festive,
and I have a box full of treats to share.
Time to put up the Christmas tree!

I hope you enjoyed my short cooking adventure. I'm already planning more, so stay tuned!

Sunday 18 November 2012

Decoden Followup

It's been two weeks since my first batch of decoden projects, so here's an update on how they've fared so far.


I've noticed that the durability of a deco project depends on a lot of factors: the type of surface to be decoed; whether it's curved or flat; the material the surface and gems are made out of; the size of gems used; the type of glue used; whether the item is going to be handled a lot.

All of my deco jobs were successful except one. I'm very happy with the lip gloss lid and the pen. Whenever I use my pen at work, it makes me happy! In fact, I want to add more to the next one and have a real "decoPEN"! The lip gloss lid also worked extremely well. Even though I grip the lid and handle it every day, the gems have stayed as stuck as anything.

The unsuccessful deco was on the BB Cream tube lid. This was the one I decided to do at the last minute. The bow charm was wobbly right from the start and came off after a couple of days. I know what went wrong, though. Even though the surface of the lid is only slightly curved (not like the domed lid of the lip gloss), the bow is much larger than the tiny rhinestone gems, so most of its surface area was not firmly attached to the lid. Also, I think the back of the bow is made of a different material to the other gems; that could have had something to do with it.

A few of the tutorials I've seen advised using two-part epoxy glue (araldite), so next time I'm at the hardware shop, I'll get some and see how it goes.

Tuesday 13 November 2012

Postcard Mania!

Last week, I was thinking about things. Lately I've been wanting to reach out to people more, and find people with similar hobbies to me. The problem is that I'm very shy. The internet has been both a blessing and a curse. I've seen and heard about so many amazing people, but been too shy to start a dialogue with them. It can be overwhelming and I become filled with doubts. I was thinking back to when I was a kid and I had penpals. I enjoyed it so much - sending and receiving letters, reading about other kids' lives, the stationery and the stickers and the stamps! They all petered out though, and for a long time I was closed off. Still, every now and then I thought fondly back to that time, but I just assumed that the art and hobby of letter-writing was dead.


About 6 months ago, I heard about the Letter Writers' Alliance from the Craftypod Podcast. The Alliance was formed to revive and promote contact through all forms of letter-writing. I was very excited and joined up straight away! I got my membership card and badge in the mail, and spent some time perusing the members-only section of the website. The cool retro stationery and the mail art, wow! But when it came to sending away for an actual penpal, I hesitated. The matching process didn't seem to be very detailed - you only had to supply your age and gender. I was worried that all sorts of things could go wrong. What if I didn't get along with my penpal? What if I couldn't think of anything to put and my letters were boring, or worse, short? (When I was a kid, short letters were the pits!) And worst of all - what if I got quickly bored with it as I have with so many other hobbies and projects in the past? (I have over 30 unfinished projects of all kinds, you know!) That would be really unfair on the other person and I would feel terrible. So I put the whole thing on the backburner.


Then last weekend, I was suddenly struck with sadness that I never use my fountain pens and other cool pens anymore. This must have coincided with one of those rare moods where I feel like reaching out to people, because I was suddenly struck with an urge to find myself a penpal! I looked up the Letter Writers' Alliance again which got me all excited again, but was still concerned about the lack of detailed matching information. After a bit of judicious googling, I found a couple of penpal-matching sites that didn't look too dodgy. Even still, all my fears about being a bad penpal remained. I'm just not ready to commit to that yet.


To cut a long and rambling story short, I joined Post Crossing! It's a site that co-ordinates members to send and receive postcards. It has hundreds and thousands of members from all over the world, and has lots of satisfying stats on no. of postcards sent/received, which countries, no. of kilometres travelled, etc.

I realised that postcards are perfect for me right now because: there's a limited amount of space on them so you don't have the pressure of having to write a lot; they come with pretty pictures that you can collect so there's motivation to keep sending more; you send/receive to different people each time, so you don't have the awkwardness of being 'stuck' with someone you may not get along with.


Initially, you can apply to send up to 5 postcards. ('Apply' makes it sound hard, but you just need to click the 'Send a Postcard' button!) I decided to send only 3, because the postage was a bit more than I thought it would be. You're then given an address and card ID number. I had to rush out and buy postcards and stamps at lunch time the next day so my buddies would get their postcards ASAP!

You send the card to the person, and when they receive it, they register the ID number. For every card received, you're put on the list to be sent a postcard. Once my cards are received and registered by the three recipients, then I'll be eligible to receive 3 postcards myself! I can't wait!

In the meantime I'll probably just peruse some of the letter-writing/mail art blogs I found when I was searching. I already have waaaaay too many blogs on my reader, but I just can't help myself!

All images from Pinterest.

Sunday 4 November 2012

3 Days of Craft :: Semi-Festive Edition

I'm happy to say that I have my craft mojo back good and proper! So much that I decided to declare another 3 Days of Craft! True, the 3 days aren't consecutive (the public holiday falling this-coming Tuesday), and I have plans to do other things as well, but I'm not letting that stop me!

Technically I didn't make this first item during 3 Days of Craft, I made it earlier in the week, but I'm sharing it anyway. It's Husband's birthday cake!


It's not actually a cake, it's the Chocolate Peanut Butter Brownies from an older issue of SBS Feast Magazine. The fudgy chocolate brownie mix is given a heavy dose of peanut butter sauce, swirled through it before baking. It's supposed to be served with more peanut butter sauce, melted chocolate and ice cream, but I just made a chocolate icing and decorated it with store-bought white fudge writing icing and mini chocolate eggs. He loved it!

Now to 3 Days of Craft proper. Unfortunately there was a bit of a hiccup on Day 1 (yesterday). I decided I wanted to make a Christmas project (possibly a pair of advent calendars), so I just quickly hopped on to Pinterest to get some ideas. I ended up spending all day on there.

Oops.

It did help me narrow down my options and be more realistic, though. To make a really nice pair of advent calendars is going to take time and money. Even the more budget ones involved supplies that I don't have. (How would I get hold of 48 matchboxes??) I think we'll just buy a couple of kiddie ones this year, and I'll start earlier with making some really nice ones next year. Having pinned pictures of hundreds of festive craft projects, I decided to start with something quite simple - a Christmas garland!


I crocheted a chain using some red acrylic yarn leftover from another project. I held it together with a strand of sparkly silver yarn that I saw when I was re-organising my projects. I hung it up in front of the lounge room window. Then, using photos from Pinterest as a reference, I cut out some circles of paper and cut them into snowflakes. I'm a bit ashamed to say, but copying designs from the internet makes prettier snowflakes than ones I've made in the past.


Then all I did was staple them onto the garland! I have only done 5 snowflakes so far, and the garland is less than half full. But I figure: it's not even December yet, so I have some time to finish it!

Then, I was inspired to start doing decoden! If you read my last post concerning the nature of decoden, you may have wondered, when is it going to actually happen? Well I declare it happened today! But it's still just baby steps so far. Here's my decoden setup:


I happened to have a cute tin from Ikea lying around, so I'm using that to keep all the supplies in. So cute! I used an old envelope to work on and squeeze the glue onto. A plate to put the gems on. As for the chopsticks, I'd read that you should have a thing called a Magic Picker to pick up the gems with, but Violet le Beaux said that a skewer or chopstick with a blob of blutac on the end works just as well. And it does! I used the other chopstick to dab glue onto the projects.

I have to say - those gems are darned tiny!!


But the 'Magic Picker' really makes it so easy! yay! I decoed my lip gloss (inspired by the photo of the decoed lip gloss tube, which I showed in my last post), a pen, and popped a couple of gems on the ends of 2 of my crochet hooks. I had a bit of glue left over, so I went rushing into my room in a tizzy to find something else to deco. I grabbed my BB Cream and glued a little bow to it. So fun!


Maybe a cheap disposable pen is a strange thing to deco? But it's only a few gems, and every time at work when I look at it, it'll remind me that I'm more than just a public servant salary-man drone. Here's a juicy close-up:


Other things I've been working on lately:
✔ As I mentioned above, I re-organised my craft projects. I put some wintery ones from the lounge back into the hobby room, and brought out some that I do want to work on so they're handier to get to. Yesterday when I was on my Pinterest bender, I also created some more specific pinboards for different crafts, so instead of spending hours trawling through stuff, I can go straight to what I'm looking for in future and hopefully spend less time on the internet. (I'd like to think that time spent wasn't all in vain!)
✔ The Rainbow Afghan. I've finished all 14 sections now, and I'm just waiting for the black edging wool to arrive from Bendigo Woollen Mills to finish it off.
✔ I've been working quite a lot on the Babbi Blanket. I'm on the 2nd-last square (out of 20), but I realised today that I don't have enough edging yarn left to finish it off (I've been using it for the Squares Blanket as well). So I had to place another order with Bendigo Woollen Mills! Oh dear! ツ
✔ I've decided on a new zombie afghan project and I have both the wool and the pattern all ready to go. BUT - I've vowed not to start it until I've finished BOTH of the above projects. I promise!

Happy crafting!

[Later]
I found a parcel on my doorstep soon after writing this post - it was my wool! So happy! I can finish off my Rainbow Afghan now!

Saturday 27 October 2012

Consider if you will : Decoden


What is Decoden? It's a craft and/or fashion that comes from Japan. The 'deco' part is short for 'decorated', and the 'den' part is short for 'denwa', meaning 'phone' in Japanese. In a nutshell, it's the Japanese version of bling. Decoden has been popular in Japan for a while, but has only been seen in other countries in the last couple of years. I can see why it's such a popular craft: youth culture in Japan is very much about self-expression and individuality, and when everyone is walking around with the same model of phone or ipod, the urge to personalise it must be irresistible!

When I first heard of decoden a year or so ago, I liked the idea of it, but thought: it's not for me. Part of me loved it and wanted to embrace it, but the realist in me knew that it wouldn't fit into my current lifestyle. As anyone who knows me knows, I'm not that into my mobile phone. Heck, I forget to take it with me half the time! Plus the model I have is a style that doesn't come with a case. And I could picture myself on a crowded tram, tired after a long day, in my conservative work outfit, whipping out something like the above. It would be just too bizarre. So I had no desire to decorate it. And quite frankly, things like this were a bit scary:


The other thing I'd seen decoden used with was nail art. From day to day, I'm lucky if I have nail polish on at all, let alone unchipped and more than just a quick swipe of a single colour. So when I saw things like this, I was gobsmacked!:


Wow! I really admire art like this, but it's just too impractical for me (or for most women, I imagine). The dress code at my work doesn't specifically cover nail art, but I'm sure that if I turned up one day in something similar to the above, I'd be pulled aside for a bit of a chat.
For a long time I was content to sit on the sidelines and consider decoden as one of the Crafts I Don't Do. I admired it from afar. But then .... a few weeks ago, I saw this:


My heart started beating faster. I suddenly realised that I could have decoden that worked for me. I could bling up things that I use every day. Things that I only use at home, if I wanted to keep it private. And it didn't have to be precious things where it had to be perfect, either. I could do a little bling or a lot, as the whim took me. I suddenly had an overwhelming urge to decoden!
To the internet I went, checking my blog reader for tips and most importantly, where to get supplies from! Mana Starre's Blog had a handy list of her top 5 decoden suppliers, which led me to Miss Sapporo on Etsy. I procrastinated for a few days, and I'm glad I did, because when I went back, there was a 20% off everything sale! See, it was meant to be. So I bought up big. Here's my haul:


Look out for decoden soon!

In other news, I've taken up a little crochet again as well. Not so much to really be worth taking photos of, but hopefully soon. I worked a little on my filet crochet horsehead design, and quite a lot on my rainbow afghan. In fact, I'm excited to say that I've started the last section! (It calls for 14 in total.) It's finally time to buy the edging yarn from Bendigo Woollen Mills. I think the reason why I've suddenly latched onto this project after all this time is: it's a zombie project. You know the ones, even if you're tired after a hard day at work, you can just sit in front of the TV and churn out a couple of rows without any thought. You don't need to refer to the pattern or try to remember complicated stitches. It's just nice and easy.

In fact, I'm specifically looking for a zombie-style pattern for my next afghan project. Yes, I am.

Tiny Thriller, from Mochi Mochi Land.

Friday 24 August 2012

I've been writing

This week I've been suddenly interested in writing haiku again. When I was at university, I came across haiku in my research on Japanese culture. They really resonated with me. I'd tried writing poetry in school, but it always felt clunky and forced. I never knew when to end a poem, or how many themes it should have. Haiku are deliberately short and sweet. They also appealed to my spritual side, because they're (usually) about appreciating nature.
Reading about the history and form of haiku, I realised there are many misconceptions about them. People have said to me, "I hate haiku, I had to write them in school and I got sick of counting the syllables. Why do there have to be exactly 17 syllables?" I quickly realised in my research that this isn't true!


The 17-syllable rule was only applied in very strict poetry-writing competitions; in most other cases, it never mattered, as long as the poem had 3 lines, with the first and third being a bit shorter than the second. Japanese is a very different language to English, and the concept of a syllable can't really be applied to it. The closest it has is a unit called the on, which is more like a word-unit than a syllable. Japanese words tend to be longer as well, so you would need less syllables in English to convey the same amount of information, anyway. Here's a haiku by Basho, the most famous haiku master, as an example:

furuike ya / kawazu tobikomu / mizu no oto

old pond / a frog jumps in / sound of water

I found out lots of other interesting things about haiku as well. Originally, they were called hokku, and they were shorter sections of longer poems called renga. A renga consisted of a series of haiku-like verses, alternating with a two-line joining verse. Generally, the minimum length was around 35 verses. In the Heian (medieval) period, people would gather at inns for group poetry-writing sessions. Each person would write a verse, sometimes changing topics abruptly, challenging the next to create a verse that flowed as a complete poem. Many of these poems were humorous or romantic, matching the informal mood at the inns. Regular poetry-writing competitions became popular, and there was prestige as well as material prizes for the winners. It's thought that haiku were first written as starter verses for renga, but it may be that they developed in their own right. A concise 3-line poem can convey more technical skill than a longer, open-ended one.

Though the 17-syllable rule is less important than many people realise, there are two things that a good haiku should have. The first is a kigo, or a season word. Documents have been found with long lists of pre-defined kigo. As haiku are traditionally a poem which appreciates or celebrates nature, an element which gives an indication of the season or weather the poem is set in is important. Kigo need not be obvious or restrictive however. Many kigo are subtle and it takes a familiarity with Japanese customs and history to identify them. In the example by Basho above, the frog is a reference to Spring. In modern haiku, this concept is more open - words can be used to evoke a sense of familiarity or an emotional response from the reader, rather than a stricter concept of season. For example, this is a poem I wrote in response to an experience I had earlier today:

Dull corporate kitchen
Bright yellow cheers a work-worn soul -
Pear-shaped sponge

In this poem, I have tried to convey a certain feeling ('dull'; 'work-worn'), then being pleasantly surprised by a small detail (a normally boring kitchen item that has a quirky shape and colour) which pulls me out of my dull mood. There is no mention of nature or seasons, rather the poem tries to convey a small but significant experience occuring in a familiar environment. In a more traditional poem, the pear and the colour yellow (perhaps even the sponge?) might have stood for seasons. Here, they stand for more abstract concepts, yet the purpose of triggering visual and emotional contemplation is the same.


The other convention that haiku normally have is a break (kireji in Japanese). This change of direction usually occurs in the somewhere in the middle line, or at the end of one of the lines. It can involve the introduction of a new concept, or a break in the rhythym of the poem. This adds energy and prevents the poem from becoming dull and monotonous.

So much sunlight
Suddenly bursting through
Is it really spring?

In this haiku I wrote the other day (which was my first one in years, so I admit isn't the best!), the first two lines are a single statement. Then there's a break where I suddenly switch to asking a question. Often poets in English will use punctuation to emphasise a break, but I wanted it to be quite subtle. The fact that the first and second lines both start with a hard 's' sound, while the third starts with a soft 'izz' sound, is enough to emphasise this. Hopefully, when the reader reaches the end and realises the last line is a question, their attention will jump back to the rest of the poem, they will visualise the imagery I described, and will contemplate possible answers to the question.

So, though haiku have conventions, as all poetry forms do, they're actually not as restrictive and dull as many people seem to think. The trick to haiku is not getting the number of syllables right, but using the 3 lines to delight the reader and spark a heightened appreciation of nature. Japan also has a long tradition of linking poetry with painting, something I'd like to explore more of soon.

Friday 13 July 2012

Wacky!

I was at the library last week to pick up a book, and on the display near the front door, I saw Wacky Baby Knits, by Alison Jenkins. Of course I had to grab it!


There are 20 patterns for babies, some more wacky than others. My favourites were the Cupcake Hat, Elvis Wig Hat, Winged Bootees, Monster Mittens and Bootees set, and the Cow Suit. The Aviator Hat was more elegant than wacky, but I also liked that one a lot, too.


I'm umming-and-aahing over whether to make the Cupcake Hat or the Aviator Hat first. The Cupcake Hat is more complicated, but the instructions for the Aviator Hat are more ambiguous. I find baby patterns to be a bit frustrating on the sizing. I know it's hard - babies grow so fast! - but it's still annoying. Most patterns I've come across have "0-3 months" as the smallest size. I only realised through trial and error (not knowing that much about babies until recently) that an item that will fit a 3-month-old will be far too big for a newborn. So when I give an item in that size to someone who's just had a baby, it's way too big and they can't use it yet. It's disappointing for me, and I'm sure it is for them as well, and I can never be sure if they actually use the item later on or if it gets lost among the piles and piles of stuff that new parents usually get given. That's nobody's fault! I'm just saying that the maximum satisfaction all around comes when you give something to a parent, and they can start using it straight away.


There are only a few baby items which don't need to be fitted. Off the top of my head, I'm thinking of washcloths, bibs and blankets. I'm quite happy to make any of these (though blankets obviously take a long time); the only issue with them is the "it's too nice to use" factor. On the other hand, I'm really a process-oriented knitter. I like thinking of a design, figuring out how to do it, and then doing it. That's what give me a sense of satisfaction. Most of the scarves and headbands and etc I've made for myself, I never even wear. It's the process of making them that makes me happy. So the idea that something I've made might never get used, isn't really that upsetting to me as it might be for other people.

Anyway, I'm over-thinking again. I'm going to knuckle down now and decide which project to start first!

Tuesday 10 July 2012

Many Projects

Hello! After a fairly long absence, about a month ago I started to become really motivated to craft again. This came about because of a couple of things: really cold weather, which makes me want to make scarves and hats and gloves! Two of my friends having babies, which makes me want to create little treasures! And just last weekend, a geek-themed trivia night, which put me back in touch with my geeky interests and made me want to start churning out Jane hats and Dr Who scarves!
In a word, I'm excited!

Today I'm just going to share a quick run-down of what I've been doing in the last month, so get ready for some photo-spam! Later on, there'll be more in-depth posts.

So the first thing I did was make these baby booties. This was about a month ago. S and B came over for a craft/card-playing afternoon. I decided to start some booties from the Quick and Easy Baby Knits book. It's a simple pattern and I thought I'd get a good way into it. In fact, I worked hard and I finished them in one afternoon! Yay me! I was able to give them to Ms E at her baby shower.


I also started a project that I'd been meaning to make for a couple of months - cat toys! They're semi-urgent because I want to make them for a friend as a thank-you gift for something that's rapidly moving further and further into the past! My plan is to make a set of 3 in simple shapes. I'm about half-way through the spherical one:


I've also been working a little bit on my rainbow-coloured afghan, which doesn't really have a name. I've nearly finished this section, and I think I only have about 2 or 3 to go. I'm very happy about that!


I have a few ideas in mind about other afghans I'd like to work on, so it'll be good to have that finished off so I can start one of those. Or, knowing myself, I'll just start one of them anyway!
I'm also coming along well with the Jane hat for Husband. I want to get both his and my hats finished before the charity Firefly screening, which is in about 6 weeks. I think I'm well on track for that (if I don't get distracted by other projects!). I altered the original pattern so it's more fitted. That means less stitches, which means finished quicker. Yay!


I'm still on a bit of a Hama bead kick, and a few weeks ago I made this little storage box. My perfume vials kept falling over all the time, and it was really annoying me. So I made a box to put them in!


I made it with a lip on the bottom edge for stability, and just the right size and height for all my mini perfumes. It also fits perfectly on my mirror base, just where I wanted it to go. The pattern was something I just made up. The polka dots are a little uneven, but I like it that way! I made each piece separately and glued them to the base with epoxy glue. I don't know if I would use this method again. I found the edges of the beads were a very small surface to glue together. It came out how I wanted it to, but I don't think it's very strong. It holds together fine for its purpose, but I wouldn't want to test its strength. There are a few other methods you can use to make a 3-D box; I'll try one of those next time. I'm pretty excited about this - being able to make little containers in just the right size and shape that you want them (not to mention colour!), instead of hunting around the shops for hours and usually not finding anything. I love Hama beads!

I'm so inspired at the moment! I even had a dream the other night about making an afghan. It was a 70s retro-ghan, made out of granny squares. Each square had an orange centre, a couple of rounds of brown, and then a couple of rounds of cream to lighten it up. I want to make it in real life! Though I don't have any orange or brown wool, funnily enough!

I'm just completely wired at the moment!

Thursday 28 June 2012

My First Cloth Mask!

As promised, here's a post about my first time using a cloth face mask. It's not a review, just a few comments about my experience with it. The mask I used was the Ffid Coenzyme Q10 Cloth Mask that I was given by my lovely friends who brought me some beauty products back from Japan. I used it one day last week when I was home sick and I thought I deserved a treat!

This is what the packaging looked like. I can't read Japanese text at all, but I've read enough beauty blogs to know in general how they work. I figured that 15-20 minutes would be a good time to keep it on my face.


I took the mask out of the packet and unfolded it. It was soaked realy well with serum, so much that it was practically dripping! I was very pleased with that. Applying the mask to my face with all the little shaping parts to it was more complicated than I thought it would be, but the persistence was worth it!
Now, I have to apologise in advance for this next picture! I was embarrassed about how I looked in the mask, plus the photos didn't turn out too well, so I decided to spruce them up a bit by making this collage:


One touch that I loved was that the mask had little flaps for the eyes which you flip up once you're ready to lie back and relax. I don't know if other eye masks have this, but I hope so! I used the time to listen to a guided relaxation MP3 on my iPod.
The serum was clear and had no smell. As I said before, the mask was soaked with it, so when I removed the mask, I rubbed it into my face and also my neck. In fact there was also plenty of serum left in the packet, so I squeezed it into a spare little pot I had, and applied it over the next few nights.

I have to say - I'm a cloth face mask convert! I love them! I want more!