Yesterday I went on a little outing to Castlemaine. Regional public transport is free of charge all of this week, an offering that was apparently made because of a recent series of issues in the transport network. Seeing as I have some free time on my hands at the moment, I decided to go on a little day trip to a country town. I chose Castlemaine because it has several attractions within walking distance of the train station, plus it's known for its heritage buildings.
This was in some ways a big step for me. In the last few years, my anxiety has gotten worse, and I've let it get the best of me much of the time. It's made me reluctant to go to social occasions or go anywhere on my own. I nearly changed my mind about going several times in the week beforehand, imagining all the terrible things that could have happened. But in reality, the "worst" thing that happened was I didn't have time to see everything I wanted to see! Going on an adventure like this was a huge boost to my confidence.
The train left Southern Cross Station from platform 16, at the opposite end from where the regional trains normally leave from. After wandering around for a while, I caved in and asked an attendant. I'm glad I did, or I would never have found it!
The trip to Castlemaine takes about 1-1/2 hours. The landscape gave way from urban wasteland, to farmland, and eventually to bush.
I arrived at the replica 'historic' station at about 10.45.
The weather was overcast and extremely humid the whole day, but at least not too hot. I found the art gallery without any issues thanks to the maps on my spiffy new ipad.
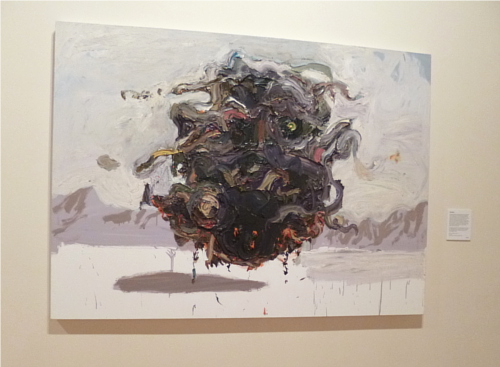
The art gallery is quite small comparatively, but it had some beautiful pieces. The feature exhibition was by the war artist Ben Quilty.
There was also a room of 19th- and 20th-century Australian art with some beautiful portraits.
When I first entered, the lady behind the front desk mentioned that there was a museum downstairs. I'm so glad she told me because there were no signs and I certainly wouldn't have found it otherwise. It was an amazing space, packed full of treasures telling the story of the local area. While the art gallery up above had quite a few patrons while I was there, there was no-one else in the museum at all, which was quite sad, but it gave me a chance to have a good look at everything and take some sneaky photos.
While I was there, a lady came in and started chatting to me. She was the curator of the museum! She told me all about the silver collection of over 250 pieces, and the arts and crafts that had been created by former residents of the town. She told me that if I was interested in that sort of thing (yes!!) I should visit Buda, a historic house nearby. I had been planning to go to the Botanic Gardens, but listening to the history of the home's inhabitants convinced me that I definitely wanted to go. I asked her for directions, which she was of course very pleased to give me.
On the way to find Buda house, I stopped off at a 'hole-in-the-wall' place to buy a coffee. I asked the lovely gentleman if he had any gluten-free snacks. He didn't have any left, but he was so lovely about it, and mentioned that they had gluten-free options for their lunch service, that I determined to go back there for lunch. After drinking my coffee and contemplating life for a bit, I walked on to find Buda house. It's on the edge of town, up and down several steep hills. I have to admit, a couple of times I thought to myself, where the heck am I?
I eventually found it and went in. It was fascinating. The house had been built prior to 1860 in the style of the time, with small rooms dimly lit with small windows. Then in the early 1900s, an extension had been built on to provide a sitting room, music room and gallery. The contrast between the old part of the house and the new is striking -- the new rooms being much larger, with large windows giving an airy feel.
The history of the Leviny family was fascinating as well. The mother and father had 8 children. Only three married; the other five (all girls) lived in the house for the majority of their long lives. Thanks to their father's inheritance, they were able to pursue their love of arts and crafts, everything from photography to metalwork. I have to admit, I wasn't a little envious on hearing that! Many of their personal belongings, as well as their artworks, were on display in the house. It really gave a personal touch and I found it quite moving.
The extensive garden was wonderful as well. There was a pond, herb gardens, a cypress hedge, and some amazing pine trees. At first I thought this beauty was a Monkey Puzzle Tree!, but on googling it I found out it's actually a Bunya Pine. Still gorgeous though!
The garden had an interesting mix of 'traditional' style plants, and cacti and succulents.
After the excitement of the garden, I was starting to get hungry. I walked back into town and found the Good Table again. With help from another lovely waiter, I selected the pork with polenta, and strawberry semifreddo for dessert. I had a Pimms fruit cup as a treat. I love some irony with my food!
The food was excellent, if overpriced. I do want to go back with a bigger group though, so I can sit at the table with the chicken centrepiece!
It was time to go home, so I headed back to the train station. I had half an hour to wait (country trains!) so I wandered around for a bit and saw what is presumably the original train station.
I was planning to read on the way home, but I did some more thinking and ended up having a nap.
It was a really lovely day, and I'm proud of myself for engaging with other people, following my instincts, and being open to new possibilities.
Friday, 29 January 2016
Wednesday, 27 January 2016
The Gluten-Free Files : Sausage Rolls
I've been gluten-free for over 2 months now, and it's mostly going very well. There are a few things I miss though, so I thought I'd make a list of them and experiment with making gluten-free versions. First on the list is sausage rolls!
As I often do, I chose a recipe and then changed my mind at the last second, found I didn't have all the ingredients, substituted some and ended up with something quite different. This is the recipe that Ibutchered was inspired by. I also found the tips from For Dummies here really handy.
And I apologise in advance again for the photospam -- most of my cooking posts seem to have a ridiculous number of photos!
The basic ingredients. The flour is a commercial pre-mixed blend of tapioca, rice flour and potato flour. I read that you can use chia seeds instead of xanthan gum (used for binding). I happened to have some black chia seeds in the cupboard that I'd been planning to make a pudding with. And of course, butter, salt and sausage mince. I think most sausage mince is gluten-free, as they tend to use maize or soy flour for the filler, but always check the label to be sure!
Cutting the butter into the flour. This pastry tool is probably my favourite kitchen implement! I bought it from an op-shop years ago. I love how the paint is wearing off the handle. And the fact that it has a wooden handle at all, now that I think about it.
The sources I found on substituting with chia seeds said they could be ground or not, but didn't mention if they should be soaked in water first or not. After consultation with an expert in all things cooking (i.e. Husband), I decided to grind and then soak them.
The pastry dough. The black chia seeds really stand out, oops! I'll get some of the white variety to use next time. Other than that, they worked perfectly. I only added a tiny bit of water, about a teaspoon, and it still seemed a little sticky. I hoped that the next step, the chilling, would help with that.
According to the source I read, the dough should be very cold when placed in the oven, as it's the sudden heating that causes the water in the butter to steam and separate the dough into flaky layers. I flattened out the dough so it would chill faster.
Meanwhile, I made the filling. To the sausage mince, I added herbs, onion flakes, a bit of curry powder, and shredded carrot. I mixed it together with my hands, the old fashioned way! I did take a photo of that, but it looked kinda gross, so I deleted it. =D
Half an hour later, I began the rolling. The dough became sticky again very quickly, and it was difficult to work with, even with non-stick paper. I might try adding a little more flour next time.
I had to use the non-stick paper to fold the pastry up and around the filling before peeling it off, much like making sushi handrolls, if you've ever seen how they're made. But in the end, success!
Half an hour later. Gluten-free baked goods tend not to go brown, but I can assure you, they are cooked!
The dough came out quite well, I think. It's flaky and holds together quite well.
But was it worth it, cost-wise? I saw some gluten-free sausage rolls in my local supermarket for $9.99 for a pack of 3 (frozen). That's $3.33 each. Leaving out the little one, I calculated the cost of my five to be $0.67 each. Fresh! It seems so!
As I often do, I chose a recipe and then changed my mind at the last second, found I didn't have all the ingredients, substituted some and ended up with something quite different. This is the recipe that I
And I apologise in advance again for the photospam -- most of my cooking posts seem to have a ridiculous number of photos!
The basic ingredients. The flour is a commercial pre-mixed blend of tapioca, rice flour and potato flour. I read that you can use chia seeds instead of xanthan gum (used for binding). I happened to have some black chia seeds in the cupboard that I'd been planning to make a pudding with. And of course, butter, salt and sausage mince. I think most sausage mince is gluten-free, as they tend to use maize or soy flour for the filler, but always check the label to be sure!
Cutting the butter into the flour. This pastry tool is probably my favourite kitchen implement! I bought it from an op-shop years ago. I love how the paint is wearing off the handle. And the fact that it has a wooden handle at all, now that I think about it.
The sources I found on substituting with chia seeds said they could be ground or not, but didn't mention if they should be soaked in water first or not. After consultation with an expert in all things cooking (i.e. Husband), I decided to grind and then soak them.
The pastry dough. The black chia seeds really stand out, oops! I'll get some of the white variety to use next time. Other than that, they worked perfectly. I only added a tiny bit of water, about a teaspoon, and it still seemed a little sticky. I hoped that the next step, the chilling, would help with that.
According to the source I read, the dough should be very cold when placed in the oven, as it's the sudden heating that causes the water in the butter to steam and separate the dough into flaky layers. I flattened out the dough so it would chill faster.
Meanwhile, I made the filling. To the sausage mince, I added herbs, onion flakes, a bit of curry powder, and shredded carrot. I mixed it together with my hands, the old fashioned way! I did take a photo of that, but it looked kinda gross, so I deleted it. =D
Half an hour later, I began the rolling. The dough became sticky again very quickly, and it was difficult to work with, even with non-stick paper. I might try adding a little more flour next time.
I had to use the non-stick paper to fold the pastry up and around the filling before peeling it off, much like making sushi handrolls, if you've ever seen how they're made. But in the end, success!
Half an hour later. Gluten-free baked goods tend not to go brown, but I can assure you, they are cooked!
The dough came out quite well, I think. It's flaky and holds together quite well.
But was it worth it, cost-wise? I saw some gluten-free sausage rolls in my local supermarket for $9.99 for a pack of 3 (frozen). That's $3.33 each. Leaving out the little one, I calculated the cost of my five to be $0.67 each. Fresh! It seems so!
Sunday, 24 January 2016
Art Practice, Moon Magic
I'm participating in Hali Karla's Art Practice, Moon Magic art-journalling project.

I've never been into astrology (I recently found out my Moon sign and it fits me just as little as my Sun sign!) but something about the moon fascinates me lately. I thought this might be a good way to start exploring that, while encouraging me to play in my art journals more.
The project works like this: each month, at the new moon, a prompt will be posted on the blog. As the moon waxes, the participants work on the theme. Traditionally, the waxing moon is time to do work of increase, abundance and coming into being, as the moon gets bigger in the sky. It seems fitting for creating a work of art. The piece can be in any form, and the time spent as long or as little as we like. There's a link-up on the blog if we wish to share our results.
This month's theme is DEDICATION. To consider dedicating my energies, or an aspect of myself such as my creative practice, to something outside of myself.
At first, the theme didn't really resonate with me. It's been such a long time since I've done much creatively. I haven't had the energy to do very much for myself, let alone anyone or anything else. I was starting to get quite mopey when I suddenly had an idea -- what if I dedicate myself to my art and craft?
I was so excited by this that I decided to tackle the thing I feel I'm worst at art-wise. The drawing of faces! I flipped open my art journal to a random page and there was a collage piece with a face on it. I tried to copy it as best I could. I'm so out of practice that I'm a little embarrassed to show it, but here it is. And I have to apologise in advance for the bad photos, it was a dull day:
I'm not very happy with the eyes. I think it's because I tried to draw them as eyes 'should' look, rather than what I actually saw in the photo. Otherwise, it's OK. I feel happy because often I hesitate to draw in my art journals and consequently I never feel like my pages are quite finished. I always think, one day I'll get serious to improve my skills and do something more meaningful. Perhaps this is the time to begin.
I've also started my second painting on canvas. I think the square format is throwing me -- I'm used to the rectangular format of a journal.
I have no idea what it will be yet, and whenever I put it in front of me I'm confused about what to do, but I'm sure I'll get there at some point. I did with my first one!
Sunday, 17 January 2016
I made Jam
I made jam for the first time today. We had a good harvest from our plum tree this year, way too much to eat as we pick. Something had to be done! This is just under half of the total harvest. (I made stewed plums for the freezer with the rest.)
Cutting up the plums.
Look at this funny double plum! You'd never see that in the supermarket.
I was curious to see whether it was two plums that had somehow fused together, or one monster plum. There were two seeds inside, so that answers that question.
1.4 kilos of plums! I'm quite proud of my little tree.
I used this recipe from the CWA (Country Women's Assocation) Preserves cookbook. The Association is renowned in Australia for their traditional cooking knowledge. I got this cookbook just before Christmas, and I'm using it already. That's quite rare for me!
I decided not to add the port as I wanted to try a 'pure' jam for my first time.
The plums are boiling in a little water until soft.
Adding the sugar. I had to reduce the amounts to suit the amount of fruit I had, but it was a huge amount of sugar! 1.4 kilos! I had a 1-kilo bag, so I added all of it, but no more. It still felt quite wrong. But that's the traditional way....
While the jam was boiling, I prepared the jars. First I washed them in hot water and tried to get the labels off as best I could.
Sterilising them involves putting them in a slow oven for at least 15 minutes.
We tested the jam by pouring a small amount onto a plate that had been in the freezer for a while (to cool the jam down quickly). It wasn't setting as it should, so we added the juice of 1 lemon, as that causes the pectin to activate. After a second test, it was ready. I was too excited to remember to take photos of that part!
The process of filling the jars is pretty messy, but Husband, who has made jam before, assures me that this is perfectly normal.
And there we are -- 6 jars of plum jam!
Maintaining fruit trees and making produce from their harvest is certainly some work, I have to say. Pruning the trees, watering them, covering them with bird netting, monitoring the fruits so they're picked at just the right time. The process of making the jam was actually the least time-consuming; just over an hour. Sure, I could go to the supermarket and buy 6 jars of jam for $20 and save myself the time. I enjoy being amongst my trees, though. I love watching the ants run along the branches, and seeing the fruits slowly grow. I love the thought that I'll be doing the exact same thing this time next year.
Now that all the fruit is picked, I thank my tree and say to it, "you can rest now". Later this year, our work together will begin again.
Saturday, 9 January 2016
Meet my New Fur Friend!
This is Sharick. He moved into our house two days ago.
Our old cat Amy passed away over two years ago, and lately I've been starting to feel that I might be ready for a new feline companion. I didn't think it would happen quite so soon though! On Monday night a friend texted and said she wanted to talk to me about a cat. His owner wasn't able to look after him anymore, due to some personal troubles, and were we interested? On Tuesday we arranged to visit him. On Thursday we met him. He was unsettled due to everything going on in the owner's life, but otherwise seemed quite curious about us. We decided to take him. He was already in his carrier and all of his belongings were packed, so we took him home straight away.
It can take a while for cats to settle into a new home, so I was willing to wait up to a week to see if things worked out. At first he hid under the bed, but after about an hour, he came out and started exploring the house. An hour after that, he was rubbing up against Husband's leg as if they'd known each other for years. He also ate some dinner and was washing himself later on, both of which are good signs that a cat feels comfortable in its environment. We were both very pleased.
So now we are three again. It feels strange to have a cat again, but also natural at the same time. It'll take a while until we know his personality and habits well, and we're discovering new things constantly. It's an exciting time.
Hopefully I can take some better photos of him soon. I'm sure there will be many!
Friday, 8 January 2016
My Planners, and Etsy Sticker Purchase
It's taken me a long time to find a system of organising myself that works for me. I've tried to-do lists, spreadsheets and apps. I've tried dividing up tasks in various different ways. I've read articles and books on organisation and time management, and even been inspired by a dream.
For years I had a Filofax, but I started to find it increasingly tredious to find inserts for it. Plus it was boring having the same cover year after year. Having a whole new diary every year appeals to my sense of starting fresh. My diary this year is from Typo.
As a treat for myself, I purchased some stickers from Violet le Beaux's Etsy shop to decorate it with:
These sticker sheets were a huge amount of fun to work with! The high quality prints are made from Violet's watercolour illustrations. They're cut well with no white space around the edge, and come in lots of cute themes, like kitchen, craft and woodland animals. She also sent so many bonus mini sheets, I was overwhelmed! I would definitely purchase them again. Shopping local too, for the win!
Back to the planners. I use my diary (or perhaps more properly an alamanac?) to record events that happen every year, like birthdays and festival dates, as well as one-off things like lunches and appointments. I have it set up at work where I can easily see the current week's page and grab it to write in new appointments. Each day I cross out the previous day. I will only take it home with me if I'm having an extended break or a very busy weekend where I might not remember everything I'm doing.
The other book I have is my Ralph book. The name is a long story, but it comes from the dream I mentioned above. I'd much rather call it that, than something horridly sensible like an organiser. Ralph is just a normal hardback notebook from Daiso. It's basically my weekly to-do list. I take it with me wherever I go, and write down things I have to do in it as soon as I think of them.
At the top is a pre-printed insert that I glue in. I made this up in Excel and I print out copies in batches. It has everything that I want/need to do on a daily or weekly basis, to save me from having to re-write it all every week. It's evolved over time depending on my interests and habits.
Underneath is a free text section. On the left hand side I write the things I should/need to do. The right hand side is for fun or non-essential things, though I'm not hugely strict about the side things should go on. I do it this way because then I have a shorter list of things I have to do, and I feel less pressured.
Every Monday morning, I tear out the previous week's page and copy over anything still to be done. Sometimes if there's a lot, I just cut out that part of the page and glue it onto the next page! I write suggestions for blog posts on a sticky note to make it easy to transfer them to the next week. The inside of the front cover has sticky notes with other things I want to keep track of, like online orders that haven't arrived yet.
Supporting this, I have a master spreadsheet. I had this idea about a year ago. My Ralph book is designed to work week by week, but it was getting bogged down with activities and ideas to be done further in the future. My list was getting filled with more and items that I couldn't/didn't want to do yet. It was frustrating. So I moved them all to a spreadsheet which I check once a week as I'm making up my new Ralph book page. If I think of anything during the week to go on the master list, I write it on the back of the current weeks' page in Ralph and add it to the spreadsheet the next time I look at it.
A couple of days ago, I re-did my whole master list. I now have the 9 life aspects from the square I mentioned in my last post as headings. Although I'm not completely sure that this is the best way to categorise my to-dos, I'm glad I overhauled it because it gave me a chance to re-think about old ones and add new.
So that's how I organise my life. I hope this post wasn't too boring, but I've spent over 5 years working on it, so I thought there might be some useful ideas in it for someone out there.
Sunday, 3 January 2016
My 2016 Goals, or Lack of
Tada! I'm back already! I hesitated at purchasing a new laptop so soon after Christmas, but then I remembered that I need it for serious things like looking for a job and keeping my tax records, not just playing games and blogging. My new laptop is is basically the same as the old one, same brand and capacity, though it does have a larger screen and built-in keypad, which I love. My first Lenovo was called Leni, so I guess this one will be Leni 2 unless I think of something more creative.
RIP Leni!
(Unless Husband can re-image you and turn you
into a gaming machine, like he's planning to...)
This year I've been really hesitant to make any New Year's goals or resolutions. I've done that in the past and always failed in some way or another. Though, looking back on my beginning-of-year post for 2015, I did a lot more than I thought I had.
A new blog that I discovered the other day by accident inspired me, however. One of the suggested goal planning methods in this post was based on the Wheel of the Year. The Wheel is divided up into 8 sections, each with an aspect of life to focus on, e.g. Home, Career, Family. I relate much more to the number 9 than 8, so I drew up a grid with 9 squares, and added in 9 life aspects, like this:
I started trying to think up some goals for each category, but then I realised that most of them were either: double-ups from my 101 Things list, or things I just wanted to do in the next few weeks. Considering that I don't even know where I'll be at the end of this month, let alone the end of the year, I think perhaps it's best to just take things as they come and do what I can in the short term, rather than setting overarching goals for the whole year. At the very least, the square might be useful for thinking about what's important in my life.
Having said that, I'm inspired by Bunny Mummy's completion of her 2015 goal, which was a 1,000 mile walking challenge. I'm sure that I don't have either the time or fitness level to walk that far, so I've decided on a much more manageable 500km. That averages out at approximately 1.3km per day. I walk about half that from the train station to work and back again every weekday, so I think it's definitely manageable. I have the most trouble with exercising on the weekends, so hopefully having this challenge will motivate me to change that. I'll think of a nice big reward for myself later.
Other things I'm thinking of:
* work on increasing confidence and reducing anxiety
* KonMari my house
* rune/crystal studies
* go on at least one outing every month
Or I could just follow this plan:
Subscribe to:
Posts (Atom)